

How To Use Color Replace Tool Photoshop
Adobe Photoshop is a raster-based image editing software. Information technology is developed past Adobe.Inc and available for both macOS and Windows operating systems. You can employ Photoshop to create or edit images, posters, banners, logos, invitation cards, and various types of graphic designing work. It provides various tools for designing and editing and the colour replacement tool is one of them.
Color Replacement Tool
Color replacement tool, every bit the name suggests, helps to replace the color of whatever object or part of the certificate with another color chosen by the user. It is considered as the fastest fashion to change the color of any object, but it has one disadvantage as well, i.e it is not so accurate as the other methods. But it a very piece of cake method and beginner-friendly. The symbol/icon of the color replacement tool is given beneath:

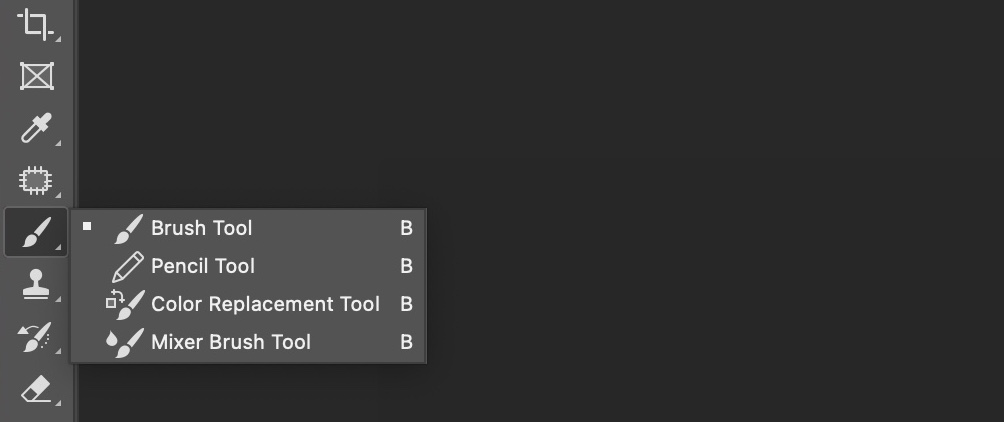
In the tool palate, it presents inside the brush tool. If nosotros right-click on the castor tool icon, we tin can see four tools:
- Brush tool
- Color replacement tool
- Pencil tool
- Mixer brush tool
Disadvantages of a color replacement tool:
Though information technology can rapidly alter the color of the image, but it creates some brightness problems and is not so accurate. The more authentic style used past professionals is by Adjustments -> Hue/Saturation. This makes the changes more accurate and truthful to the colors. Merely still, the colour replacement tool is highly recommended for beginners and students who have merely started learning Photoshop.
How to apply the Color Replacement tool?
As discussed earlier, the color replacement tool is the easiest process to supersede the color of an object with some other. Let'southward understand the function of this tool with the assist of an example:
Below is the moving picture of a flower with pink petals, now if we want to change the colour of the petals to any other colour (say Sky Blue). How to do it ??

This can exist done using the color replacement tool.
Step 1: Open the paradigm in Adobe Photoshop.

Step 2: At present we accept to select the petals of the bloom using any selection tool. Hither we are using the Magnetic Lasso Tool. Subsequently selecting the petal part we go:

Step 3: Now allow's colour select the heaven blue color from the swatches and pigment our selection with the colour using the color replacement tool. Yous will go results like this:

Therefore, we tin very easily change the color of any office of the image using the color replacement tool.
Note: If your Caps lock key is on, the cursor of the color replacement tool can exist a plus sign (+). Many students go confused. Y'all can change the cursor dorsum to the normal shape by switching off the cursor once more.
Options of Colour Replacement Tool
Now, when you click on the color replacement tool icon we can see an option bar with numerous dissimilar options.

Nosotros will at present understand them all one by one.
1. Brush Size
The first one (i.east left-most) is the brush size in which we tin can change the size of the brush and the hardness and also the angle. If y'all click on it, a dialog box volition open as given beneath:

There are options like:
- Size: To change the size of the castor.
- Hardness: To alter the hardness of the brush.
- Spacing: If we increment the spacing the brush stroke will not be continuous if will be apart from each other. (Apply just when required)
- Bending: Nosotros tin change the angle of the castor.
- Pen Pressure: It tin can simply be seen using a graphics tablet and it is not used in this case.
2. Style
This is a very important belongings of the color replacement tool. There are four different types of modes in color replacement tools.

When you click on the fashion option, y'all volition run into the different option as below:
- Color(Default): This the default mode of the color replacement tool. This style just replaces the color of the selected role of the image with the color that is chosen by the user, simply similar the example we have seen to a higher place in the commodity.
- Hue: This mode changes the hue of the selected part of the image.
- Saturation: This style can be used to make an image wait tiresome or bright by replacing the color saturation with a less saturated color makes an image expect wearisome and my replacing the color saturation with a high saturated color makes an image look bright.
- Luminosity: This mode helps to make an image brilliant or dull by changing the luminosity(ie. Calorie-free) on it. This mode is non preferred to utilize equally about of the time it destroys the image's quality.
3. Sampling
There are three sampling options bachelor and their names and description are (from the left):
(i) Continuous Sampling: In this sampling option, the colour replacement tool continuously samples the color while we paint

(ii) Once: In this type of sampling choice, the color replacement tool samples the color once and replaces the aforementioned color wherever information technology is institute with the color chosen past the user.

(iii) Groundwork: In this type of sampling option, the tool replaces the color sampled with the background color.

four. Limits
The side by side pick of color replacement is limits. This option tells the colour replacement the limit or the boundary till which it can alter the color.

Photoshop has three limits manner:
- Contiguous: In this limit pick, the tool changes the color of only the sampled expanse pixels where the heart of the cursor is and does not alter the color of the neighborhood that matches the same color
- Dis-contiguous: In this type of limit choice, the tool changes the color of the surrounding area with matched sampled color till the spread of the cursor boundary.
- Find edges: In this limit option, the tool automatically finds the edges in the picture and slows down as nosotros approach the border, and limit the color change to the edges.
5. Anti Alias
The terminal property of the colour replacement tool is anti-alias. Though anti-allonym is not a new tool. It can be seen in numerous other tools like erasers, selection tools, etc. Anti-alias in Photoshop enables the smoothing of the edges of the transformed region. By default, anti-alias is turned on. Information technology is also recommended to keep anti-alias turned on to give a perfect change in color of the edges of the image.

Source: https://www.geeksforgeeks.org/how-to-use-the-color-replacement-tool-in-photoshop/
Posted by: pettifordwifte1942.blogspot.com
0 Response to "How To Use Color Replace Tool Photoshop"
Post a Comment